


Configure Netsuite
Correct configuration of NetSuite settings in Expensify streamlines your expense management and accounting processes. This setup ensures efficient synchronization, reduces errors, and enhances reporting accuracy by aligning your workspace settings with NetSuite’s financial structure.
Best Practices for Using NetSuite
Integrating NetSuite with Expensify combines Expensify’s expense management tools with NetSuite’s accounting features. Follow these best practices to ensure seamless operations:
- Configure immediately after connecting Expensify to NetSuite, thoroughly reviewing each settings tab.
- Enable Auto Sync for daily updates from NetSuite to Expensify, ensuring up-to-date charts, accounts, and reports.
- Set a preferred exporter who is both a workspace and domain admin.
- Configure your coding settings and enforce them by requiring categories and tags on expenses.
Step 1: Configure Export Settings
Expensify offers various options for exporting reports to NetSuite. Here’s how to tailor these settings to suit your business needs.
To access export settings, navigate to Settings > Workspace > Group > Connections and click Configure.
Subsidiary
If you use NetSuite OneWorld with multiple subsidiaries, the Subsidiary option will appear. After adding a new subsidiary in NetSuite, sync the workspace connection, and it will appear in the dropdown under Settings > Workspaces > [Workspace Name] > Connections.
Preferred Exporter
While any admin can export, the preferred exporter will receive notifications about export statuses in Expensify.
Date
You can select from three export date options:
- Date of last expense: Uses the date of the latest expense on the report.
- Submitted date: The date when the employee submitted the report.
- Exported date: The date when the report is exported to NetSuite.
Accounting Method
Choose when reimbursable expenses should export, based on your accounting method:
- Accrual: Out-of-pocket expenses export when the report is approved.
- Cash: Expenses export when paid or marked as reimbursed.
Export Settings for Reimbursable Expenses
- Expense Reports: Reimbursable expenses will export as expense reports, posted to the designated payables account in NetSuite.
- Vendor Bills: Transactions export as vendor bills, mapped to the correct subsidiary and associated vendor.
- Journal Entries: Transactions export as journal entries, mapped to the appropriate subsidiary and posted to the payable account.
Additional Details
- Vendor Bills: Use NetSuite’s vendor bills feature for posting non-reimbursable expenses.
- Journal Entries: Non-reimbursable expenses will export as journal entries, without a customer column.
Export Settings for Non-Reimbursable Expenses
- Vendor Bills: Non-reimbursable expenses will export as vendor bills to the default vendor in your workspace settings.
- Journal Entries: These will export to the configured journal entry posting account. The tax classification is pulled from the employee record.
Expense Reports
Set up default corporate cards in NetSuite for accurate export of corporate card transactions. For further customization, follow these steps:
- Go to Customization > Forms > Transaction Forms > Preferred Expense Report Form > Screen Fields.
- Enable “Show” for Account for Corporate Card Expenses under the Main tab.
Step 2: Configure Coding Settings
The Coding tab allows for accurate expense classification in NetSuite. Here’s how to set it up:
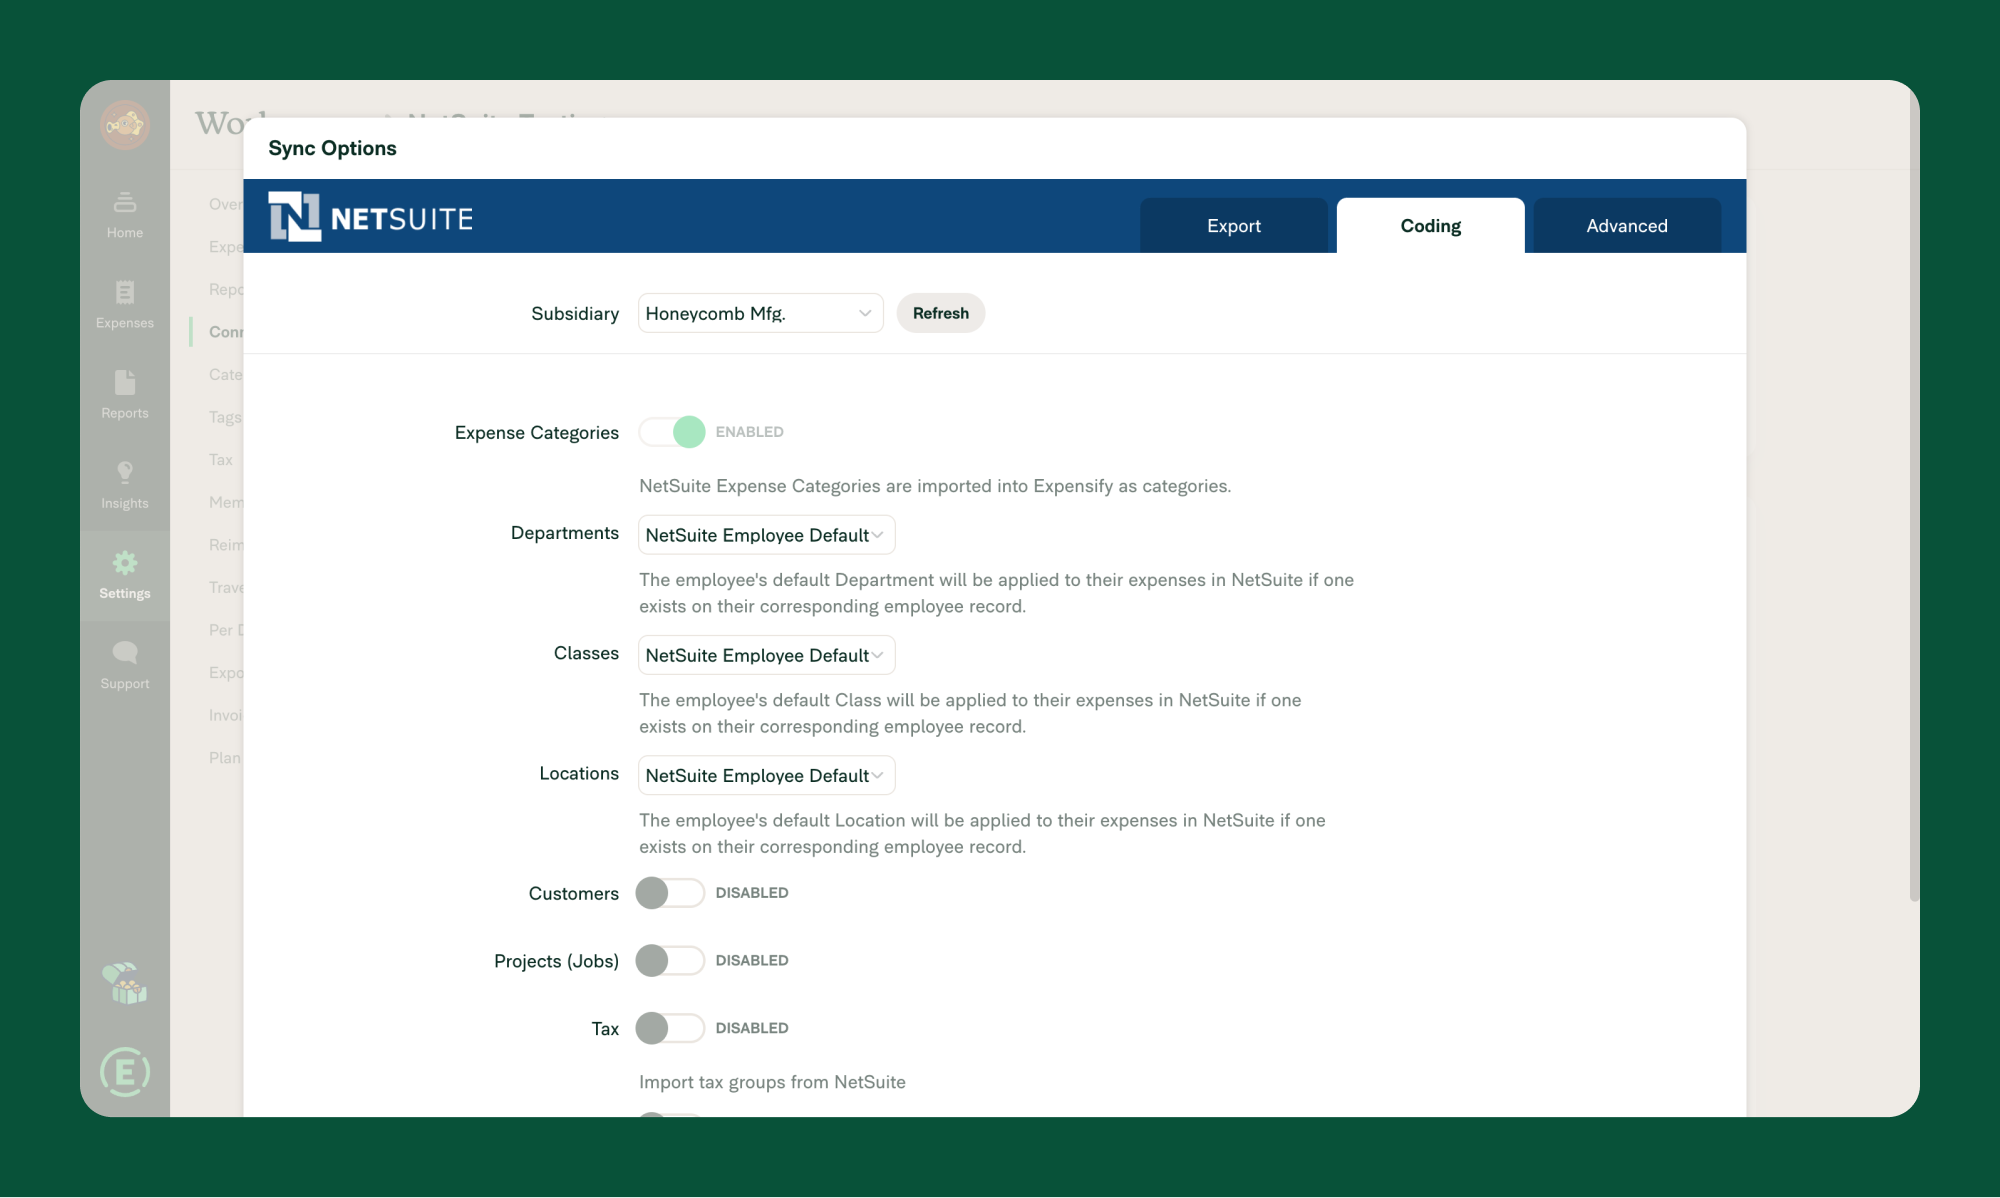
Expense Categories
- NetSuite’s expense categories are automatically imported as categories in Expensify.
- Ensure each expense has a category selected before exporting.
- Modify categories in NetSuite, as changes made in Expensify will not be reflected.
Tags
NetSuite integration allows for the configuration of Customers, Projects, Departments, Classes, and Locations as tags in Expensify. Tags are automatically applied based on employee records in NetSuite.
Report Fields
You can configure Report Fields such as Customers, Projects, and Departments to categorize expenses at the report level in Expensify.
NetSuite Employee Default
Employee defaults such as Departments, Classes, and Locations are synced from NetSuite to Expensify for consistent categorization.
Step 3: Configure Advanced Settings
Access advanced configuration settings under Settings > Workspaces > Group > [Workspace Name] > Connections > NetSuite > Configure > Advanced tab.
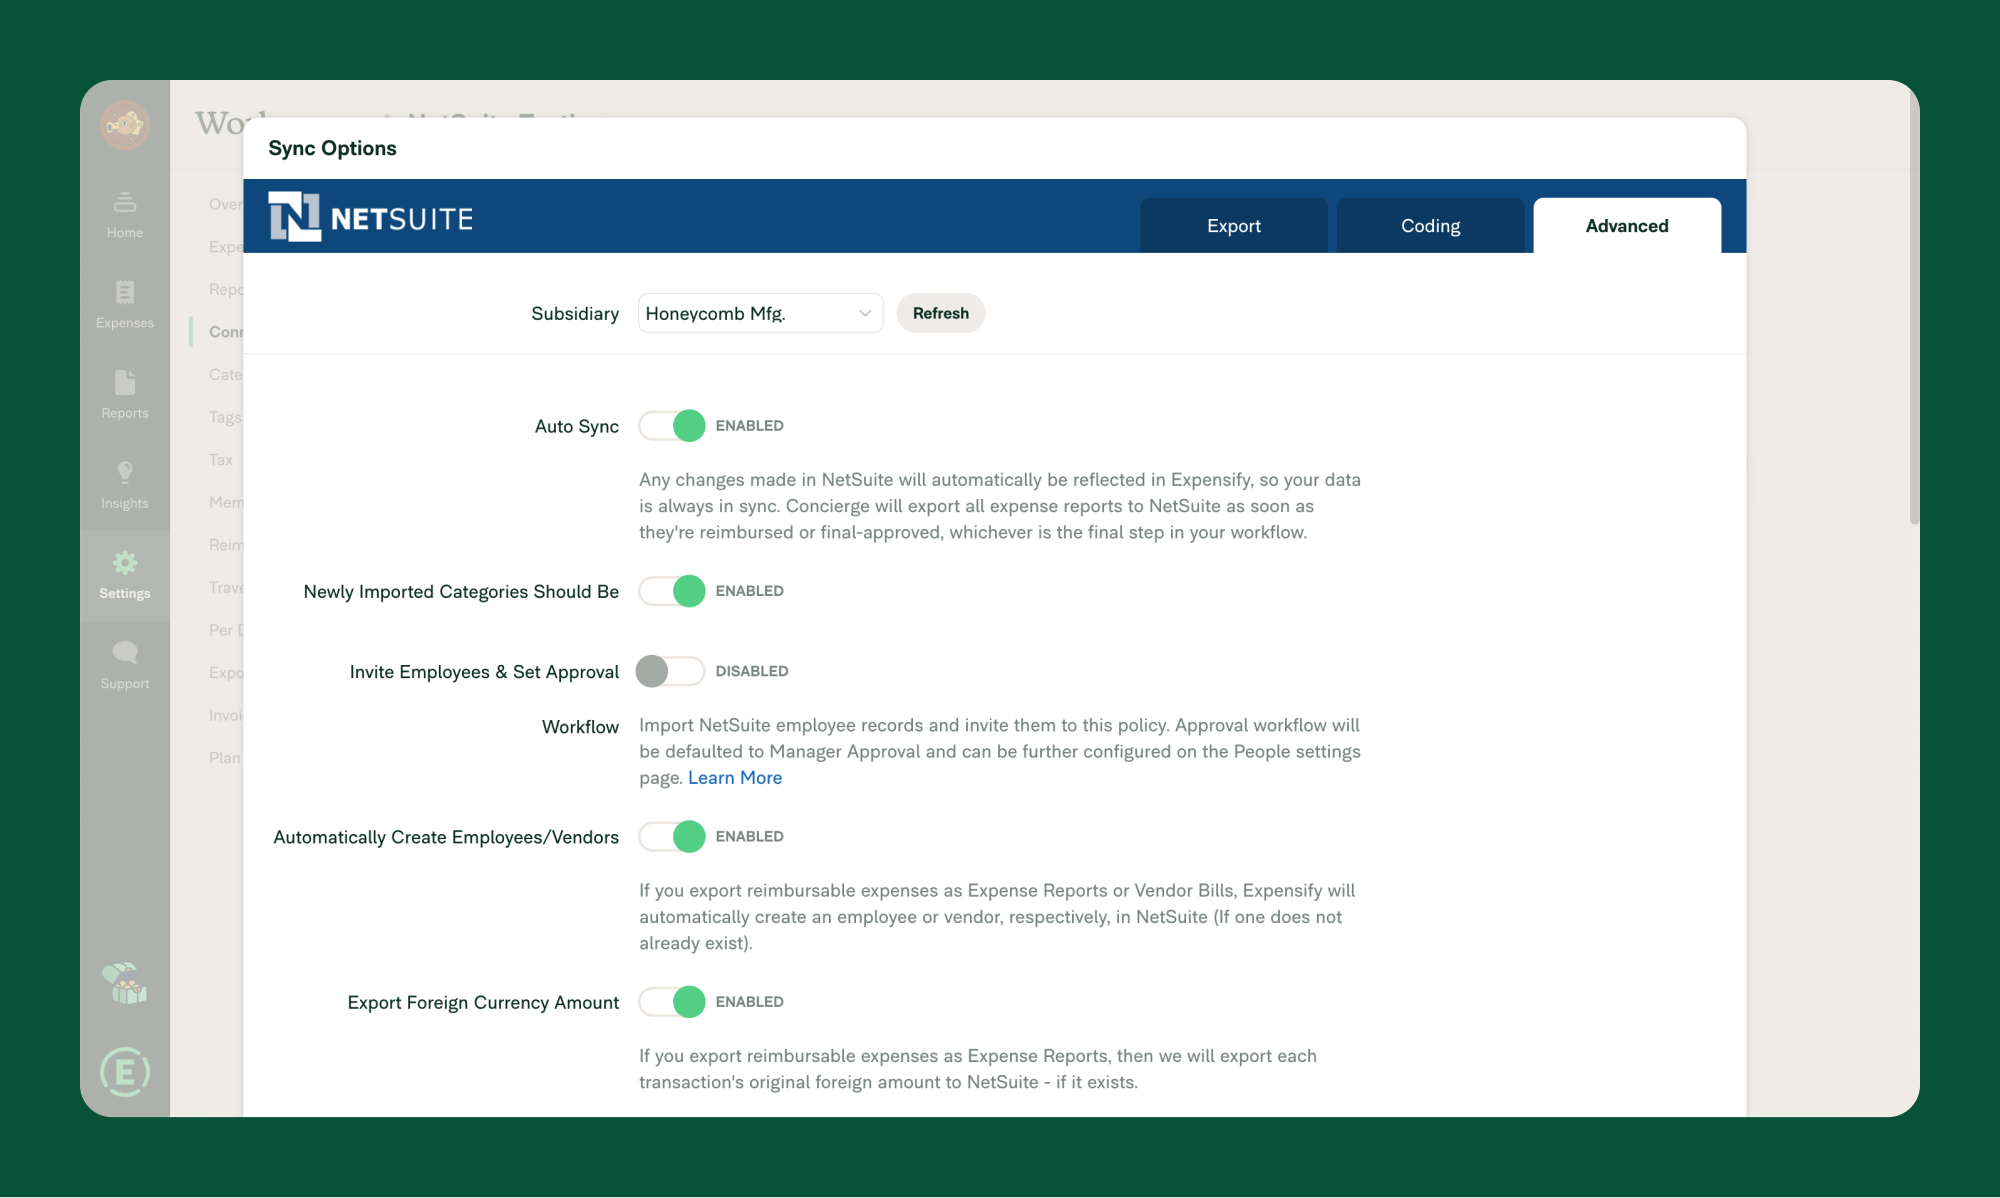
Auto Sync
Enable Auto Sync for automatic exports, daily updates, and streamlined processes.
- Automatic Export: Approved reports are automatically exported to NetSuite.
- Direct Deposit Alerts: Reimbursed reports trigger Bill Payments in NetSuite.
Invite Employees & Set Approval Workflow
- Invite Employees: Import employees from a specific NetSuite subsidiary to Expensify, automatically sending them an email with workspace details.
- Approval Workflow: Match NetSuite’s approval workflow for a seamless experience, either using Manager Approval or Basic Approval processes.
Custom Segments, Records, and Lists
Import and configure Custom Segments, Custom Records, and Custom Lists from NetSuite to Expensify for greater flexibility in expense reporting and tracking.
Multi-Currency
- Matching Currencies: Ensure that the currency in the NetSuite subsidiary matches the currency in Expensify for accurate expense management.
- Foreign Currency Conversion: Export both original and converted amounts when handling multi-currency expenses.
Exporting Invoices
Link invoices to customers in NetSuite for accurate record-keeping. Invoices marked as “paid” in Expensify will sync to NetSuite automatically.
Additional Settings
Tax Settings
Set up Tax Groups in NetSuite for easy tracking of taxes within Expensify. Ensure the correct setup by navigating to Setup > Accounting > Tax Groups.
Company Cards
Leverage NetSuite’s Company Card feature for streamlined export of both reimbursable and non-reimbursable transactions to the General Ledger.
Note: Ensure tax settings and currency match for successful integration.
FAQ
How does Auto Sync work with reimbursed reports?
Auto Sync will automatically mark a report as “paid” in NetSuite when it is reimbursed via ACH in Expensify. Similarly, a report marked as “paid” in NetSuite will automatically be marked as reimbursed in Expensify.
Why aren’t my Categories importing correctly?
Check that the Expense Categories in NetSuite are properly set up as Expense Categories, not General Ledger accounts.
What’s the difference between a Custom Segment, Custom Record, and Custom List?
- Custom Segments: Used for categorizing transactions and records.
- Custom Records: Store detailed, structured data.
- Custom Lists: Provide static dropdown options for simple selections.